连接 Kerberos 集群指南
本文主要介绍客户端在使用 Kerberos 的时候如何连接 Kerberos 集群,使用 Kerberos 安全认证。其中包含 Windows 客户端, Linux 客户端安装使用记录。
1. Kerberos 介绍
Kerberos 简介

Kerberos是一种计算机网络授权协议,用来在非安全网络中,对个人通信以安全的手段进行身份认证。这个词又指麻省理工学院为这个协议开发的一套计算机软件。
先来看看Kerberos协议的前提条件:
如下图所示,Client与KDC, KDC与Service 在协议工作前已经有了各自的共享密钥,并且由于协议中的消息无法穿透防火墙,这些条件就限制了Kerberos协议往往用于一个组织的内部。
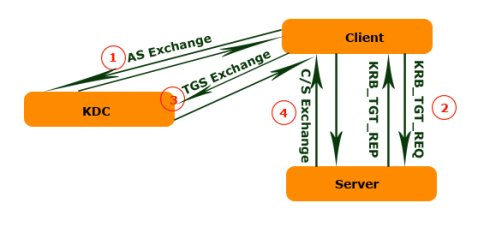
过程:
Kerberos协议分为两个部分:
-
Client向KDC发送自己的身份信息,KDC从Ticket Granting Service得到TGT(ticket-granting ticket), 并用协议开始前Client与KDC之间的密钥将TGT加密回复给Client。
此时只有真正的Client才能利用它与KDC之间的密钥将加密后的TGT解密,从而获得TGT。
(此过程避免了Client直接向KDC发送密码,以求通过验证的不安全方式)
-
Client利用之前获得的TGT向KDC请求其他Service的Ticket,从而通过其他Service的身份鉴别。
Kerberos协议的重点在于第二部分,简介如下:
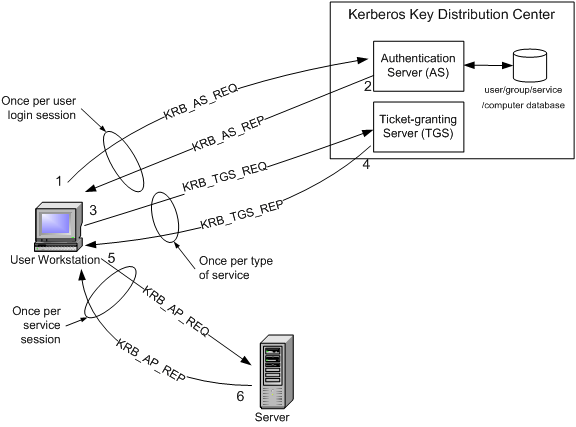
- Client将之前获得TGT和要请求的服务信息(服务名等)发送给KDC,KDC中的Ticket Granting Service将为Client和Service之间生成一个Session Key用于Service对Client的身份鉴别。
然后KDC将这个Session Key和用户名,用户地址(IP),服务名,有效期, 时间戳一起包装成一个Ticket(这些信息最终用于Service对Client的身份鉴别)发送给Service, 不过Kerberos协议并没有直接将Ticket发送给Service,而是通过Client转发给Service.所以有了第二步。 - 此时KDC将刚才的Ticket转发给Client。由于这个Ticket是要给Service的,不能让Client看到,所以KDC用协议开始前KDC与Service之间的密钥将Ticket加密后再发送给Client。
同时为了让Client和Service之间共享那个秘密(KDC在第一步为它们创建的Session Key), KDC用Client与它之间的密钥将Session Key加密随加密的Ticket一起返回给Client。 - 为了完成Ticket的传递,Client将刚才收到的Ticket转发到Service. 由于Client不知道KDC与Service之间的密钥,所以它无法算改Ticket中的信息。同时Client将收到的Session Key解密出来,
然后将自己的用户名,用户地址(IP)打包成Authenticator用Session Key加密也发送给Service。 - Service 收到Ticket后利用它与KDC之间的密钥将Ticket中的信息解密出来,从而获得Session Key和用户名,用户地址(IP),服务名,有效期。然后再用Session Key将Authenticator解密从而获得用户名,
用户地址(IP)将其与之前Ticket中解密出来的用户名,用户地址(IP)做比较从而验证Client的身份。 - 如果Service有返回结果,将其返回给Client。
- Client将之前获得TGT和要请求的服务信息(服务名等)发送给KDC,KDC中的Ticket Granting Service将为Client和Service之间生成一个Session Key用于Service对Client的身份鉴别。
2. Kerberos Client 配置
2.1 Ubuntu
准备
同步时间
1 | timedatectl set-timezone "Asia/Shanghai" # 设置系统时区 |
根据 Ubuntu 官方文档 Kerberos Linux Client 一节操作
-
安装
1
sudo apt install krb5-user
-
修改配置
修改
/etc/krb5.conf,配置如下1
2
3
4
5
6
7
8
9
10
11
12
13
14
15
16
17
18
19
20
21
22[libdefaults]
renew_lifetime = 7d
forwardable = true
default_realm = TENDATA.CN
ticket_lifetime = 24h
dns_lookup_realm = false
dns_lookup_kdc = false
default_ccache_name = /tmp/krb5cc_%{uid}
#default_tgs_enctypes = aes des3-cbc-sha1 rc4 des-cbc-md5
#default_tkt_enctypes = aes des3-cbc-sha1 rc4 des-cbc-md5
[logging]
default = FILE:/var/log/krb5kdc.log
admin_server = FILE:/var/log/kadmind.log
kdc = FILE:/var/log/krb5kdc.log
[realms]
TENDATA.CN = {
admin_server = m1.node.hadoop
kdc = 192.168.10.1
kdc = 192.168.10.2
} -
配置域名解析
修改 hosts 文件,增加如下解析记录。
1
2
3
4
5
6
7192.168.10.1 m1.node.hadoop
192.168.10.2 m2.node.hadoop
192.168.10.3 m3.node.hadoop
192.168.10.10 d1.node.hadoop
192.168.10.11 d2.node.hadoop
192.168.10.12 d3.node.hadoop -
使用 Kerberos Client
使用
kinit获取 tgt1
2
3
4
5
6
7
8
9kevin@ubuntu-kevin:~$ kinit whg
Password for whg@TENDATA.CN:
kevin@ubuntu-kevin:~$ klist
Ticket cache: FILE:/tmp/krb5cc_1000
Default principal: whg@TENDATA.CN
Valid starting Expires Service principal
2019-05-06T09:45:56 2019-05-07T09:45:55 krbtgt/TENDATA.CN@TENDATA.CN使用
kdestroy销毁 tgt1
2
3
4kevin@ubuntu-kevin:~$ kdestroy
kevin@ubuntu-kevin:~$ klist
klist: No credentials cache found (filename: /tmp/krb5cc_1000)命令使用参数和其他命令请阅读 Kerberos 用户命令
-
访问相关服务
使用
curl访问 Kerberos 认证的页面。正常访问不会出现
Error 401 Authentication required。1
2
3
4
5
6
7
8
9
10
11
12
13
14
15
16
17
18
19
20
21
22
23
24
25kevin@ubuntu-kevin:~$ curl -k --negotiate -u: -H "Content-Type: application/json" -X GET http://m1.node.hadoop:50070/
<!--
Licensed to the Apache Software Foundation (ASF) under one or more
contributor license agreements. See the NOTICE file distributed with
this work for additional information regarding copyright ownership.
The ASF licenses this file to You under the Apache License, Version 2.0
(the "License"); you may not use this file except in compliance with
the License. You may obtain a copy of the License at
http://www.apache.org/licenses/LICENSE-2.0
Unless required by applicable law or agreed to in writing, software
distributed under the License is distributed on an "AS IS" BASIS,
WITHOUT WARRANTIES OR CONDITIONS OF ANY KIND, either express or implied.
See the License for the specific language governing permissions and
limitations under the License.
-->
<!DOCTYPE html PUBLIC "-//W3C//DTD XHTML 1.0 Strict//EN"
"http://www.w3.org/TR/xhtml1/DTD/xhtml1-strict.dtd">
<html xmlns="http://www.w3.org/1999/xhtml">
<head>
<meta http-equiv="REFRESH" content="0;url=dfshealth.html" />
<title>Hadoop Administration</title>
</head>
</html>或者访问
curl -L -k --negotiate -u: -H "Content-Type: application/json" -X GET http://m1.node.hadoop:50070/webhdfs/v1/?op=LISTSTATUS正常出现 HDFS 文件列表(JSON 格式数据),没有 401 错误即代表正常访问
Error 401 Authentication required:
1 | <html> |
2.2 Centos
准备
同步时间
1 | timedatectl set-timezone "Asia/Shanghai" # 设置系统时区 |
- 安装 Kerberos Client
1 | yum -y install krb5-workstation |
其余步骤和 Ubuntu 操作相同。
2.3 Windows
Windows 默认已经支持 Kerberos,但需要使用 加入 Active Directory ,以获取 tgt。在使用 openladp 的情况下需要配置 AD proxy,这种方式比较麻烦。MIT 提供 Kerberos for Windows 来更方便的使用 Kerberos 认证。
没有使用 Windows 默认 kerberos 支持,当有程序调用Windows 集成身份验证的时候也就会认证失败。例如 IE,Chrome 浏览器登陆 Kerberos 认证的网站时,会出现 HTTP ERROR 403 错误。
参考文章:Configuring Kerberos Authentication for Windows
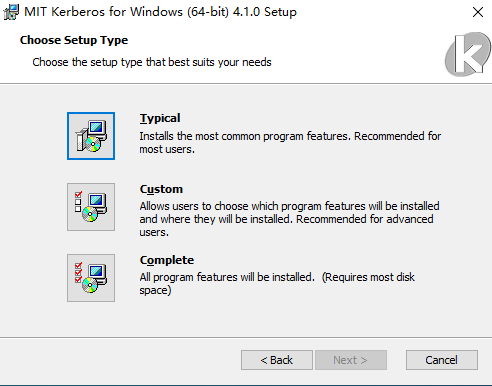
注意:在选择 kfw 版本应该与后面安装浏览器版本一致,推荐安装 64-bit kfw,因为会向下兼容
-
下载安装
安装时推荐选择 “Complete” 安装
-
配置
kfw 64位 默认安装在
C:\Program Files\MIT\Kerberos下,当然这不是重点。 kfw 会加载C:\ProgramData\MIT\Kerberos5\krb5.ini的配置文件。ProgramData目录默认是隐藏的。修改该配置文件内容为:
1
2
3
4
5
6
7
8
9
10
11
12
13
14
15
16
17
18
19
20
21
22
[libdefaults]
renew_lifetime = 7d
forwardable = true
default_realm = TENDATA.CN
ticket_lifetime = 24h
dns_lookup_realm = false
dns_lookup_kdc = false
default_ccache_name = /tmp/krb5cc_%{uid}
#default_tgs_enctypes = aes des3-cbc-sha1 rc4 des-cbc-md5
#default_tkt_enctypes = aes des3-cbc-sha1 rc4 des-cbc-md5
[logging]
default = FILE:/var/log/krb5kdc.log
admin_server = FILE:/var/log/kadmind.log
kdc = FILE:/var/log/krb5kdc.log
[realms]
TENDATA.CN = {
admin_server = m1.node.hadoop
kdc = 192.168.10.1
kdc = 192.168.10.2
} -
配置系统属性:
打开
控制面板-> 选择系统和安全-> 选择系统-> 选择高级系统设置打开系统属性面板 -> 点击高级选项卡 -> 打开环境变量新建系统变量,变量名称为
KRB5CCNAME变量值为C:\temp\krb5cache。前提时C:\temp\目录存在,krb5cache不需要创建,在使用kinit命令的时候会自动生成该文件。如果
krb5.ini的配置文件不在默认目录可以使用变量名KRB5_CONFIG指定,变量值为该文件的绝对路径 -
使用
在 CMD 中使用
kinit获取 tgt。由于 Windows 支持 Kerberos ,所有部分命令默认时 Windows 的。比如
klist。修改环境变量,让 kfw 命令覆盖 Windows。
编辑
Path环境变量,将kerberos变量上移至最上面即可。
在 CMD 中使用
klist即可查看以获取的 tgt
注意:
由于 Java 也实现了 kerberos client 认证机制,在 JDK 的 bin 目录提供了 kinit 、 klist 等相关命令,在配置Path 环境变量时,Kerberos 的优先级应该比 JDK 的要高。
403 分析:
在没有安装 kfw 时,系统已经具有 klist 命令,该命令位于 C:\WINDOWS\system32 。
1 | C:\WINDOWS\system32>klist |
相关命令使用前查看 klist
2.4 JVM
根据 Java Platform, Standard Edition Security Developer’s Guide
描述,Java 为开发人员提供了 JAAS 和 Java GSS-API 来使用 Kerberos 认证。前者是直接认证,后者是使用调用底层认证。
注意: 根据 JCE 描述,由于一些国家的进口管制限制,一些版本的 JDK 或者 JRE 允许强,但有限的加密策略。所以如果需要无限长度加密策略,
需要下载 Java Cryptography Extension (JCE) 支持。详细描述请查看 JCE 压缩包中的 README.txt。而 Kerberos 的加密正式需要无限长度支持。
下载地址为 Java Cryptography Extension (JCE) Unlimited Strength Jurisdiction Policy Files 8 Download 。
下载后解压到 JAVA_HOME\jre\lib\security 即可。
-
配置
Kerberos Requirements 中描述了
JDK 是如何使用 Kerberos 的。它支持系统属性值,和krb5.conf配置文件读取。为了便于使用,下面仅配置使用krb5.conf注意: 系统属性值比配置有更高的优先级!
JDK 查找配置文件的算法如下:
-
系统属性 ``java.security.krb5.conf` 指定文件位置
-
查找配置文件位置 (java-home 为 JDK 安装目录)
<java-home>\conf\security(Windows)<java-home>/conf/security(Solaris, Linux, and macOS)
-
如果上述没有找到,则查找如下位置:
-
/etc/krb5/krb5.conf(Solaris) -
C:\Windows\krb5.ini(Windows) -
/etc/krb5.conf(Linux) -
~/Library/Preferences/edu.mit.Kerberos,/Library/Preferences/edu.mit.Kerberos, or/etc/krb5.conf(macOS)
-
所以,在 Windows 中,应该把
krb5.conf更名为krb5.ini放在C:\Windows\krb5.ini。 -
-
验证
在 CMD 下,进入到
JAVA_HOME\bin\中,执行kinit和klist。关于命令的具体使用,请查看 Security Tools and Commands
3. 浏览器访问 Kerberos 服务
参考文章 How to configure supported browsers for Kerberos and NTLM
PingFederate Integrated Windows Authentication (IWA)适配器支持Kerberos和NTLM身份验证协议,但是需要配置一些浏览器来使用它们。
对于Kerberos和NTLM身份验证,PingFederate IWA适配器使用SPNEGO(Simple and Protected GSS-API Negotiation)机制协商Kerberos或NTLM作为底层身份验证协议。下面的每个浏览器都支持SPNEGO,但是由于浏览器和操作系统的结合,存在的差异可能会影响在每个实例中协商的协议。
The PingFederate IWA Adapter supports the following browsers:
- Internet Explorer
- Mozilla Firefox
- Google Chrome
- Apple Safari
3.1 Internet Explorer
鉴于 Windows 原因,不进行配置。
3.2 Firefox
当前 Firefox 版本 64.0.2(64-bit)
参考 Configuring Firefox for Negotiate Authentication 、 Integrated Authentication
3.2.1 Linux
-
在地址栏中键入about:config,点击
I accept the risk !,进入配置页面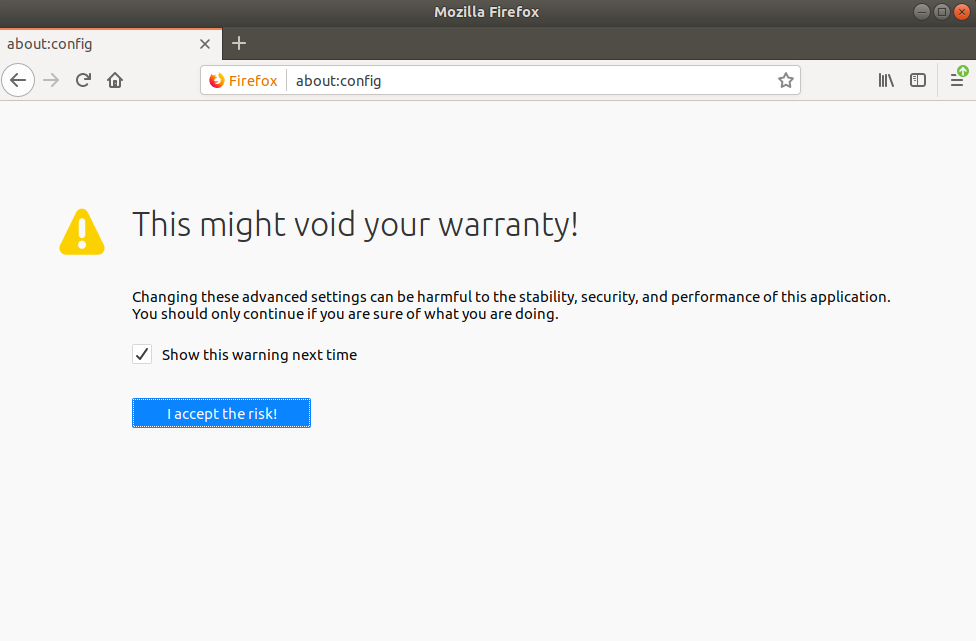
-
配置 SPNEGO authentication
配置
network.negotiate-auth.trusted-uris为允许使用浏览器进行SPNEGO身份验证的站点, 支持统配。多个站点使用逗号隔开。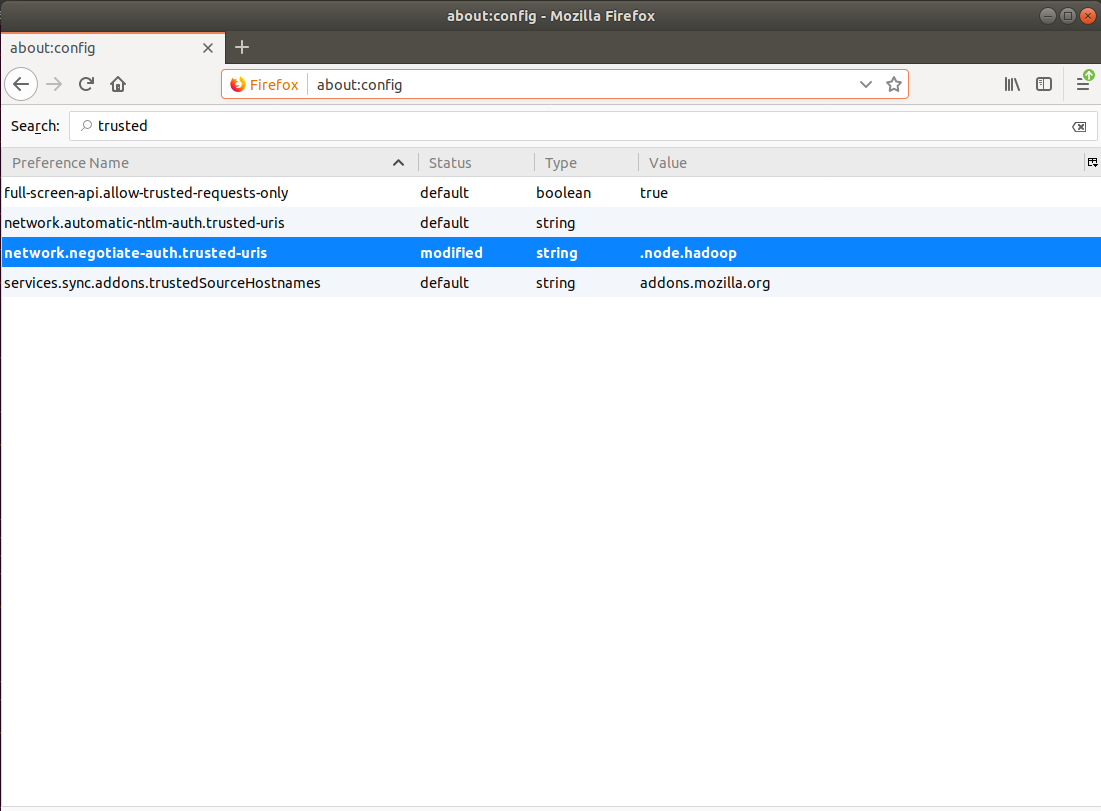
然后使用
kinit获取认证 tgt 之后,打开 Chrome 访问服务页面。没有出现 401 即为正常。
3.2.3 Windows
注意:Firefox 浏览器版本应与前面安装的 kfw 版本一致,否则会出现 401 。如果 kfw 为 64bit 则不用关注这一点。
和 Linux 相同,修改 Firefox 配置
1 | network.negotiate-auth.trusted-uris |
然后使用 kinit 获取认证 tgt 之后,打开 Chrome 访问服务页面。没有出现 401 即为正常。
3.3 Chrome
3.3.1 Linux
根据 Chrome HTTP authentication 中 Integrated Authentication 描述 Chrome 是支持 Kerberos 和 NTLM 认证的。默认不会启用,只有从代理接收身份验证协商或者在白名单的服务器协商时,才会启用继承身份验证。
3.3.1.1 Chrome 策略组启用白名单
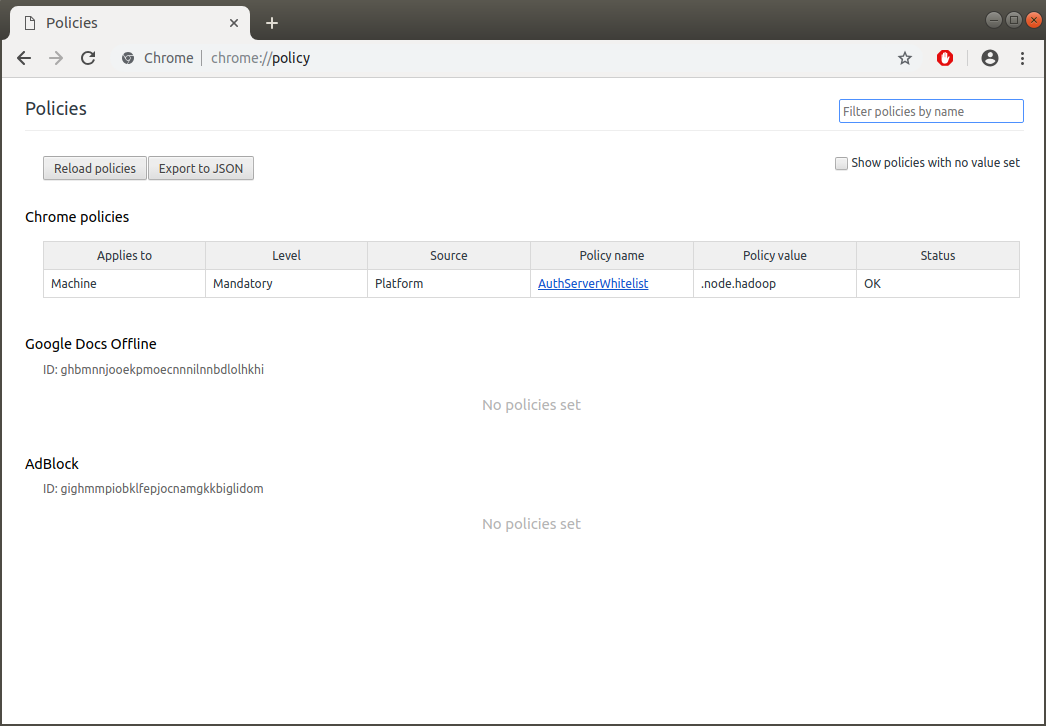
添加白名单可以通过 AuthNegotiateDelegateAllowlist 策略设置。多个白名单用以逗号分隔。
对于Chromium,策略配置文件位于/etc/chromium之下,对于谷歌Chrome,策略配置文件位于/etc/opt/chrome之下。在这些目录中保存着两组策略:一组是管理员需要并强制执行的,另一组是推荐给用户但不是必需的。这两组在:
1 | /etc/opt/chrome/policies/managed/ |
如果这些目录不存在,请创建它们:
1 | mkdir /etc/opt/chrome/policies |
确保非管理员用户无法写入/托管下的文件;否则,他们可能只是覆盖您的策略来获得他们想要的配置!
1 | chmod -w /etc/opt/chrome/policies/managed |
要设置所需的策略,请在 /etc/opt/chrome/policies/managed/ 下创建一个名为 test_policy.json 的文件。
1 | touch /etc/opt/chrome/policies/managed/test_policy.json |
在这个文件中,放入以下内容:
1 | { |
就是这样!下次在该机器上启动谷歌Chrome时,主页将被锁定到这个值。
在地址栏输入 chrome:policy 查看当前策略
在使用 kinit 获取认证 tgt 之后,打开 Chrome 访问服务页面。没有出现 401 即为正常。
3.3.1.2 使用命令行参数启动
根据 Run Chromium with flags 中描述,Chromium(和Chrome)支持接受命令行标志(或“开关”),以便启用特定功能或修改默认功能。
当前可用参数可以查看 List of Chromium Command Line Switches 。
可以使用 –auth-server-whitelist 参数启用白名单功能。
1 | chrome --auth-server-whitelist=".node.hadoop" |
3.3.2Windows
由于 Chrome 自身不带有 Gssapi,而是调用操作系统类库,而且依赖于 Internet 选项 配置。因此不在配置。
具体内容请参考 Chrome HTTP authentication 中 Negotiate external libraries 部分